08 February 2011

Gingered Carrot Cake Cookies


If it’s not chocolate, it’s not worth baking! Okay,  once in awhile I’ll do lemon, maybe raspberry (which goes oh so well with chocolate), and Gravenstein apple Pie  in the summer.  But, my husband Mark’s favorite dessert is carrot cake.  When I saw this recipe on a  blog, I had to try it for Mark's’ sake.   I’ve been on a chocolate cookie run since Christmas.  I usually bake a carrot cake for Mark on New Years Eve, but was unable because we were in Southern California, so I baked these cookies for him as a belated birthday treat.  Even thought they have no chocolate, I found them yummy!

Gingered Carrot Cake Cookies


Makes: 18 cookies
Prep Time: 15 minutes | Bake Time: 16 to 18 minutes

Ingredients:
2 cups all-purpose flour
1 teaspoon baking powder
½ teaspoon salt
1 teaspoon ground ginger
Pinch of grated nutmeg
¾ cup (1½ sticks) unsalted butter, at room temperature
2/3 cup granulated sugar
1/3 cup light brown sugar
1 egg
½ teaspoon vanilla extract
1 cup shredded carrots (about 3, peeled and trimmed)
1 cup sweetened shredded coconut
1 cup raisins
½ cup coarsely chopped pecans

Directions:
1. Position oven racks in the upper-middle and lower-middle positions and preheat the oven to 375 degrees F. Line two baking sheets with parchment paper or silicone baking mats.
2. Whisk together the flour, baking powder, salt, ginger and nutmeg.
3. With a stand or hand mixer, beat the butter on medium speed until creamy and smooth. Add the sugars and beat until light and fluffy, about 2 minutes, then add the egg and beat for another minute. Reduce the mixer speed to low and beat in the vanilla. Continuing on low speed, add the flour mixture in 2 or 3 batches and beat only until they just disappear into the mix. The dough will be very thick, but don’t overbeat to incorporate the flour. Using a rubber spatula, mix in the carrots, coconut, raisins and pecans.

Click here for printable recipe


06 February 2011

Sweet and Sour Chicken


Last week was Chinese New Year, so something Chinese was appropriate.  When eating Chinese other than mu shu, one of my favorites is Sweet and Sour.  I've tried many versions, but they don't have the same consistency as my favorite Chinese Restaurant, until now.  Besides being authentic, this recipe is easy to make.  I managed it on a work night.  Most of the time is taken up in the baking.  The leftovers were great for lunch.  I altered the recipe and added green pepper, red onion and pineapple, they were not in the original recipe.  I don't like chunk sized pieces of pineapple so I chopped the sliced pineapple to tidbit (remember when we could buy tidbits?)  sized pieces.  If you like chunks, you could add those.  I've had sweet and sour with carrots added too, but can live without those, you could add sliced carrots.  I guess what I'm saying is the sauce and chicken  is a great place to begin!

Sweet and Sour Chicken

Yield: 4 servings
Prep Time: 30 minutes | Bake Time: 1 hour

For the Chicken:
3-4 boneless,skinless chicken breasts, cut into chunks
Salt and pepper, to taste
1 cup cornstarch
2 eggs, slightly beaten
¼ cup canola or vegetable oil

For the Sauce:
¾ cup sugar
4 tablespoons ketchup
½ cup vinegar (preferably rice or white)
1 tablespoon soy sauce
1 teaspoon garlic powder
1. Preheat oven to 325 degrees.
2. Season chicken with salt and pepper.
3. Working in two batches, toss the chicken pieces in cornstarch and then coat with the egg. Heat the oil over medium-high heat and again in two batches, brown the chicken, turning it so that all sides are browned.
4. Place the chicken in a single layer in a 9×13 baking dish.
5. Whisk together the sauce ingredients in a small bowl and pour evenly over the chicken. Turn the chicken to ensure each piece is coated.
6. Bake for 1 hour, turning the chicken every 15 minutes.

Adding Vegetables:

3/4 of a large green pepper, cut in large cubes
1/2 of a red onion cut in large cubes
1 small can of slice pineapple cut in tidbit sized pieces
Add to the chicken after the first 15 minutes and stir.

Click here for printable recipe

Adapted from The Brown Eyed Baker

03 February 2011

Chipotle Bean Burritos

  
It's a long story  why this burrito looks like a flat tortilla.  When I decided to try this recipe from Cooking Light Magazine I bought the low fat tortillas for the first time.  Knowing I had a whole package of tortillas and the salsa to use up I decided to make egg burritos for breakfast.  Needless to say, low fat tortillas didn't impress Mark.  He thought if he fried it then it would be edible.  The picture is his fried, unrollable burrito.  I suffered through the low fat tortilla enjoying all the other good things.  When eating the leftover beans I was to lazy to stop at the market on the way home to get real flour tortillas so I sprayed corn tortillas with Pam and baked for about 15 to 20 minutes to make a tostada.  It was much better than a low fat tortilla burrito, so I've adjusted some of the low fat aspects of the original recipe.  The bean mixture is so easy and delicious, so long Rosarito Refried Beans.


Serves 6

Ingredients:
1  tablespoon  canola oil
1  garlic clove, minced
1/2  teaspoon  chipotle chile powder
1/4  teaspoon  salt
1/3  cup  water
1  (15-ounce) can  black beans, drained
1  (15-ounce) can  kidney beans, drained
3  tablespoons  refrigerated fresh salsa
6  (10-inch)  flour tortillas 1  cup  shredded pepper jack and cheddar cheese
1 1/2  cups  chopped plum tomato (about 3)
1 1/2  cups  shredded romaine lettuce
6  tablespoons  thinly sliced green onions
6  tablespoons  light sour cream

Directions:
 1. Heat oil in a large nonstick skillet over medium heat. Add garlic to pan; cook 1 minute, stirring frequently. Stir in chile powder and salt; cook 30 seconds, stirring constantly. Stir in 1/3 cup water and beans; bring to a boil. Reduce heat, and simmer 10 minutes. Remove from heat; stir in salsa. Partially mash bean mixture with a fork.
2. Warm tortillas according to package directions. Spoon about 1/3 cup bean mixture into center of each tortilla. Top each serving with about 2 1/2 tablespoons cheese, 1/4 cup tomato, 1/4 cup lettuce, 1 tablespoon onions, and 1 tablespoon sour cream; roll up.

Click here for printable recipe

Adapted from Cooking Light

02 February 2011

Lemon Caper Calamari Steaks with Broccolini


That’s just so good, how good is that? I found calamari steaks at the super market for the first time in ages bought them and put them in the freezer. They used to be a regular at Trader Joes, but disappeared, as things do there. We use to eat these often when we were first married and on an tight budget. We love lemon and capers and broccoli, so what’s there not to like? It reminds me of the wonderful abalone we had prepared by a chef at Russian Gulch about 10 years ago, he needed eggs and we had them, so we bartered eggs for his deliciously prepared abalone!

Lemon Caper Calamari Steaks with Broccolini

Serves 4
Prep time:  10 minutes
Total Time 20 minutes

Ingredients:
1/4 cup olive oil
3 garlic cloves, crushed in a garlic press
1/4 teaspoon dried hot red-pepper flakes
1 lb Broccolini, trimmed
1/3 cup water
1/4 teaspoon salt
3 tablespoons all-purpose flour
1/4 cup finely grated Parmigiano-Reggiano
1/4 teaspoon black pepper
1 large egg
1 tablespoon water
4 frozen calamari steaks (1 lb total), thawed
2 tablespoons unsalted butter
1 to 1 1/2 tablespoons fresh lemon juice
1 tablespoon bottled capers in brine, rinsed and drained
Accompaniment: lemon wedges

Directions:

Heat 2 tablespoons oil in a 12-inch heavy skillet over moderate heat until hot but not smoking, then cook garlic and red-pepper flakes, stirring, until golden, about 30 seconds. Add Broccolini and cook, turning with tongs, until coated with oil, then add water and salt and cook, covered, stirring occasionally, until crisp-tender, 8 to 10 minutes. Transfer to a platter with tongs and keep warm, loosely covered with foil.

Heat remaining 2 tablespoons oil in a 10-inch heavy skillet over moderately high heat until hot but not smoking. While oil heats, stir together flour, cheese, and pepper in a wide shallow bowl, then lightly beat egg with water in another wide shallow bowl. Dredge 1 calamari steak in flour mixture, shaking off excess, then dip in egg mixture, letting excess drip off, and transfer to a plate. Dredge another steak in flour and dip in egg in same manner, then sauté coated steaks over moderately high heat, turning over once, until golden, about 1 1/2 minutes total. Transfer to platter with Broccolini and keep warm, loosely covered. Dredge, dip, and sauté remaining 2 steaks in same manner, transferring to platter.

Pour off fat from skillet, then add butter, lemon juice (to taste), and capers to skillet and cook over moderate heat just until butter melts, about 45 seconds. Pour lemon caper sauce over calamari steaks and serve immediately.

Click here for printable recipe


27 January 2011

S'mores Nut Bars


My favorite part of summer barbeque and camping is the S'mores after the meal!  This recipe looked good, but I wasn't sure I could adulterate a S'more with peanuts.  Surprisingly, the salty crunch added by the peanuts were delicious.  There is no longer a need to wait until the summer season for this rich treat.  The original recipe called for 10 quartered marshmallows, I had a full bag of mini marshmallows in the cupboard and thought they worked quite well.

S’more Nut Bars

Yield: 24 bars
Prep Time: 30 minutes | Bake Time: 15 minutes | Chill Time: 3 hours

Ingredients:
2¼ cups graham cracker crumbs
1 tablespoon dark brown sugar
2/3 cup unsalted butter, melted
7½ ounces milk chocolate, coarsely chopped
7½ ounces dark chocolate, coarsely chopped
1½ teaspoons light corn syrup
1 cup heavy cream
3 cups mini marshmallows
½ cup lightly salted whole peanuts
½ cup chopped lightly salted peanuts

Directions:
1. Preheat the oven to 300 degrees F. Butter the sides and bottom of a 9×13-inch baking pan or spray it with nonstick cooking spray.
2. In a large bowl, stir together the graham cracker crumbs and brown sugar. Add the butter. Combine the mixture, then turn it out into the prepared pan. Press the crust into an even layer along the bottom and up the sides of the pan. Use the bottom of a measuring cup to create a perfectly even crust.
3. Bake the crust for 10 to 15 minutes, or until the crust is golden brown. Remove the pan from the oven and place on a cooling rack.
4. In a large heatproof bowl, toss the chocolates together. Drizzle the corn syrup over the chocolate and set aside.
5. In a medium saucepan, bring the cream just to a boil. Remove from the heat and pour the cream over the chocolate mixture. Let stand for 2 to 3 minutes. Starting in the center of the bowl and working your way out to the edges, whisk the chocolate mixture in a circle  until completely smooth. Fold in the marshmallows and the whole peanuts. Pour the mixture into the prepared pan and use an offset spatula to spread it as evenly as possible. Sprinkle the top with the chopped peanuts.
6. Refrigerate for at least 3 hours, or until set. Cut into squares and serve. The bars will keep in the refrigerator, covered, for up to 3 days.

Adapted from  Brown Eyed  Baker

23 January 2011

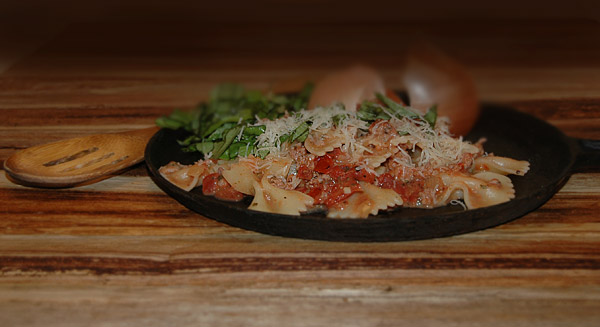
Farfalle with Tomatoes and Cream


Browsing for ideas for the weeks menus I came across a recipe listed as one of the “best” pasta recipes on Epicurious.  It sounded easy and delicious, but made a lot more than we would have eaten in a week without never wanting to eat it again.  After reading all the comments I adapted the recipe to fit our tastes, cut it in half and lightened it.  When I took the last of the leftovers to work for lunch Mark complained that I’d taken his leftovers, the whole recipe might not have been a bad idea!     

Farfalle with Sausage Tomatoes and Cream

Ingredients:
              1 tablespoons olive oil
1/2 pound hot Turkey Italian Sausages, casings removed
1/2 cup chopped onion
2 garlic cloves, minced
1 15-ounce can diced tomatoes mashed with a potato masher.   
1/4 cup whipping cream
1/2 pound farfalle (bow-tie pasta)
1/2 cup (packed) chopped fresh basil
Freshly grated Pecorino Romano cheese

Directions:
Heat oil in heavy large skillet over medium-high heat. Add sausage and crushed red pepper. Sauté until sausage is no longer pink, breaking up with back of fork, about 5 minutes. Add onion and garlic; sauté until onion is tender and sausage is browned, about 3 minutes longer. Add tomatoes and cream. Reduce heat to low and simmer until sausage mixture thickens, about 3 minutes. Season to taste with salt and pepper.

Meanwhile, cook pasta in large pot of boiling salted water until tender but still firm to bite. Drain, reserving 1 cup cooking liquid. Return pasta to same pot. Add sausage mixture and toss over medium-low heat until sauce coats pasta, adding reserved cooking liquid by 1/4 cupfuls if mixture is dry. Transfer pasta to serving dish. Sprinkle with basil. Serve, passing cheese separately. 

Serves 3
 
Adapted by Carol from Epicurious


20 January 2011

Mu Shu Chicken and Plum Sauce


When I made the maple pork loin, I planned to have leftovers to make the Pork and Mushroom Wraps that I was linked to on Fine Cooking's site.  Mark gobbled up all the left over pork for lunch before I found an evening at home to make them.  I was left with cabbage and mushrooms that needed to be eaten, so when planning the weeks meals I purchased half a boneless chicken breast, roasted it the night before and made this for dinner when I got home from work.  This made dinner for the 2 with leftovers for another meal, hopefully!

Mu Shu Chicken

Ingredients:

3 cups of thinly sliced cabbage
1 teaspoon kosher salt
1 tablespoon hoisin sauce
1/2 tablespoon soy sauce
1 teaspoon Asian sesame oil
1/2 teaspoon rice vinegar
1 1/2 tablespoons canola oil
1 cup of cooked chicken breast cut match-stick size
3 scallions trimmed, white and light green part thinly sliced, green part cut in 2 inch slivers (keep separate)
about 2 cups of mushrooms, stemmed and  thinly sliced, I used both shiitake and cremini
1 large egg, beaten
1 teaspoon of minced fresh ginger
1 teaspoon of minced garlic
4 flour tortillas
1 /4 cup Plum Sauce or Hoisin Sauce for serving

Directions:
Place the sliced cabbage in a colander over the sink and toss with 1/4 teaspoon salt.  Let sit for 10 minutes.  Pat dry.

In a small bowl, combine the 1 tablespoon hoisin sauce with soy sauce, sesame oil and vinegar.  Set aside.

In a 12-inch heavy duty nonstick skillet, heat 1/2 tablespoon of the oil over medium het until shimmering.  Add the chicken (optional:  sprinlkle with salt) and cook stirring until it starts to brown around the edges, about 3 minutes.  Transfer to a large plate.

Add 1/2 tablespoon of the remaining oil to the pan and once it is shimmering, add the scallion whites and the mushrooms, cook stirring occasionally, until they brown and soften, 2 to 3 minutes.  Push the mushroom mixture to one side of the pan and add the egg.  Cook, scrambling and breaking up with a wooden spoon or spatula into small pieces,  until just set, about 1 minute.  Transfer to the plate with the chicken.

Add remaining 1/2 tablespoon oil to pan, once it's hot, add the scallion greens, cabbage, ginger, and garlic (optional:  sprinkle with salt).  Cook, stirring occasionally until softened, about 2 minutes.  Add the reserved hoisin sauce mixture and the chicken mixture to the  to the cabbage and stir to distribute the sauce.  Cook, stirring for 1 minute to meld flavors.

You can use purchased plum sauce or hoisin sauce.  Here's my favorite recipe for plum sauce if you want to make your own:

To serve: 

Place one 1 tablespoon of plum sauce (or hoisin sauce) down the center of a heated flour tortilla.  Arrange a generous amount of chicken mixture over the sauce and wrap the tortilla, burrito-style.

Adapted by Carol from Fine Cooking

Plum Sauce

Ingredients:
12 ounces plum jam
2 cloves garlic
1 Tablespoon dry mustard
2 slices ginger (or 1/2 teaspoon dry)
1/4 c. red wine vinegar

Directions:
Mix in food processor until smooth, store in refrigerator.

Thanks to Audrey Bashaw of Riverside, CA in the early 80's.