27 January 2011

S'mores Nut Bars


My favorite part of summer barbeque and camping is the S'mores after the meal!  This recipe looked good, but I wasn't sure I could adulterate a S'more with peanuts.  Surprisingly, the salty crunch added by the peanuts were delicious.  There is no longer a need to wait until the summer season for this rich treat.  The original recipe called for 10 quartered marshmallows, I had a full bag of mini marshmallows in the cupboard and thought they worked quite well.

S’more Nut Bars

Yield: 24 bars
Prep Time: 30 minutes | Bake Time: 15 minutes | Chill Time: 3 hours

Ingredients:
2¼ cups graham cracker crumbs
1 tablespoon dark brown sugar
2/3 cup unsalted butter, melted
7½ ounces milk chocolate, coarsely chopped
7½ ounces dark chocolate, coarsely chopped
1½ teaspoons light corn syrup
1 cup heavy cream
3 cups mini marshmallows
½ cup lightly salted whole peanuts
½ cup chopped lightly salted peanuts

Directions:
1. Preheat the oven to 300 degrees F. Butter the sides and bottom of a 9×13-inch baking pan or spray it with nonstick cooking spray.
2. In a large bowl, stir together the graham cracker crumbs and brown sugar. Add the butter. Combine the mixture, then turn it out into the prepared pan. Press the crust into an even layer along the bottom and up the sides of the pan. Use the bottom of a measuring cup to create a perfectly even crust.
3. Bake the crust for 10 to 15 minutes, or until the crust is golden brown. Remove the pan from the oven and place on a cooling rack.
4. In a large heatproof bowl, toss the chocolates together. Drizzle the corn syrup over the chocolate and set aside.
5. In a medium saucepan, bring the cream just to a boil. Remove from the heat and pour the cream over the chocolate mixture. Let stand for 2 to 3 minutes. Starting in the center of the bowl and working your way out to the edges, whisk the chocolate mixture in a circle  until completely smooth. Fold in the marshmallows and the whole peanuts. Pour the mixture into the prepared pan and use an offset spatula to spread it as evenly as possible. Sprinkle the top with the chopped peanuts.
6. Refrigerate for at least 3 hours, or until set. Cut into squares and serve. The bars will keep in the refrigerator, covered, for up to 3 days.

Adapted from  Brown Eyed  Baker

23 January 2011

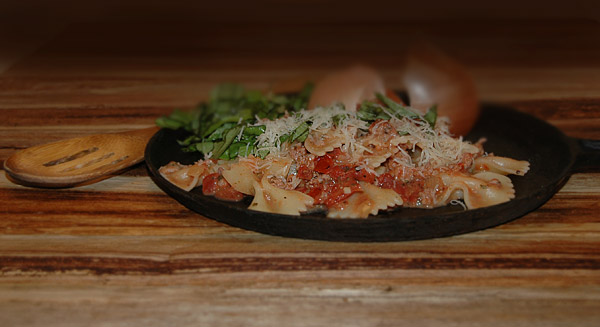
Farfalle with Tomatoes and Cream


Browsing for ideas for the weeks menus I came across a recipe listed as one of the “best” pasta recipes on Epicurious.  It sounded easy and delicious, but made a lot more than we would have eaten in a week without never wanting to eat it again.  After reading all the comments I adapted the recipe to fit our tastes, cut it in half and lightened it.  When I took the last of the leftovers to work for lunch Mark complained that I’d taken his leftovers, the whole recipe might not have been a bad idea!     

Farfalle with Sausage Tomatoes and Cream

Ingredients:
              1 tablespoons olive oil
1/2 pound hot Turkey Italian Sausages, casings removed
1/2 cup chopped onion
2 garlic cloves, minced
1 15-ounce can diced tomatoes mashed with a potato masher.   
1/4 cup whipping cream
1/2 pound farfalle (bow-tie pasta)
1/2 cup (packed) chopped fresh basil
Freshly grated Pecorino Romano cheese

Directions:
Heat oil in heavy large skillet over medium-high heat. Add sausage and crushed red pepper. Sauté until sausage is no longer pink, breaking up with back of fork, about 5 minutes. Add onion and garlic; sauté until onion is tender and sausage is browned, about 3 minutes longer. Add tomatoes and cream. Reduce heat to low and simmer until sausage mixture thickens, about 3 minutes. Season to taste with salt and pepper.

Meanwhile, cook pasta in large pot of boiling salted water until tender but still firm to bite. Drain, reserving 1 cup cooking liquid. Return pasta to same pot. Add sausage mixture and toss over medium-low heat until sauce coats pasta, adding reserved cooking liquid by 1/4 cupfuls if mixture is dry. Transfer pasta to serving dish. Sprinkle with basil. Serve, passing cheese separately. 

Serves 3
 
Adapted by Carol from Epicurious


20 January 2011

Mu Shu Chicken and Plum Sauce


When I made the maple pork loin, I planned to have leftovers to make the Pork and Mushroom Wraps that I was linked to on Fine Cooking's site.  Mark gobbled up all the left over pork for lunch before I found an evening at home to make them.  I was left with cabbage and mushrooms that needed to be eaten, so when planning the weeks meals I purchased half a boneless chicken breast, roasted it the night before and made this for dinner when I got home from work.  This made dinner for the 2 with leftovers for another meal, hopefully!

Mu Shu Chicken

Ingredients:

3 cups of thinly sliced cabbage
1 teaspoon kosher salt
1 tablespoon hoisin sauce
1/2 tablespoon soy sauce
1 teaspoon Asian sesame oil
1/2 teaspoon rice vinegar
1 1/2 tablespoons canola oil
1 cup of cooked chicken breast cut match-stick size
3 scallions trimmed, white and light green part thinly sliced, green part cut in 2 inch slivers (keep separate)
about 2 cups of mushrooms, stemmed and  thinly sliced, I used both shiitake and cremini
1 large egg, beaten
1 teaspoon of minced fresh ginger
1 teaspoon of minced garlic
4 flour tortillas
1 /4 cup Plum Sauce or Hoisin Sauce for serving

Directions:
Place the sliced cabbage in a colander over the sink and toss with 1/4 teaspoon salt.  Let sit for 10 minutes.  Pat dry.

In a small bowl, combine the 1 tablespoon hoisin sauce with soy sauce, sesame oil and vinegar.  Set aside.

In a 12-inch heavy duty nonstick skillet, heat 1/2 tablespoon of the oil over medium het until shimmering.  Add the chicken (optional:  sprinlkle with salt) and cook stirring until it starts to brown around the edges, about 3 minutes.  Transfer to a large plate.

Add 1/2 tablespoon of the remaining oil to the pan and once it is shimmering, add the scallion whites and the mushrooms, cook stirring occasionally, until they brown and soften, 2 to 3 minutes.  Push the mushroom mixture to one side of the pan and add the egg.  Cook, scrambling and breaking up with a wooden spoon or spatula into small pieces,  until just set, about 1 minute.  Transfer to the plate with the chicken.

Add remaining 1/2 tablespoon oil to pan, once it's hot, add the scallion greens, cabbage, ginger, and garlic (optional:  sprinkle with salt).  Cook, stirring occasionally until softened, about 2 minutes.  Add the reserved hoisin sauce mixture and the chicken mixture to the  to the cabbage and stir to distribute the sauce.  Cook, stirring for 1 minute to meld flavors.

You can use purchased plum sauce or hoisin sauce.  Here's my favorite recipe for plum sauce if you want to make your own:

To serve: 

Place one 1 tablespoon of plum sauce (or hoisin sauce) down the center of a heated flour tortilla.  Arrange a generous amount of chicken mixture over the sauce and wrap the tortilla, burrito-style.

Adapted by Carol from Fine Cooking

Plum Sauce

Ingredients:
12 ounces plum jam
2 cloves garlic
1 Tablespoon dry mustard
2 slices ginger (or 1/2 teaspoon dry)
1/4 c. red wine vinegar

Directions:
Mix in food processor until smooth, store in refrigerator.

Thanks to Audrey Bashaw of Riverside, CA in the early 80's.


19 January 2011

Hamburger Buns


 Saturday we ventured into the big city and went to Ikea in Emeryville.  Between the drive and the layout of the store that's an all day trip.  We ventured to a shopping area next door, with all the usual mall shops, that's part of the old town that had been redeveloped into stores with living space above.  The restaurants in the shopping area were the usual chains, PF Chang, Wahoo's, and Coldstone.  We decided to give a The Elephant Bar a try.  Their menu was quite varied and the burgers looked so good that I decided that it was time to have burgers at home, even if it was still too damp to grill them.

I decided to make my own buns so that I wouldn't throw away the 6 we don't use!  I made the recipe into 7 smallish buns and 4 hot dog buns.  The buns were a tad small once I got the burgers together, but more than enough bread for me.  Next time I'll make a smaller burger.  I'm hoping they'll freeze well.  Good bye store bought buns!


 Hamburger Buns

1 tablespoons granulated sugar
1 packets or 1 scant tablespoons active dry yeast
1/4 cup warm water (105°F to 115°F)  (I warmed water and milk in the microwave and let them cool)
1 cups warm milk (105°F to 115°F)
1 tablespoons vegetable oil
1 teaspoons salt
3 to 3 1/2 cups King Arthur Unbleached All-Purpose Flour*
egg wash: 1 egg beaten with 1 tablespoon cold water
sesame, poppy or caraway seeds or coarse salt (optional)
*We give you this fairly wide variation for a couple of reasons. First, you'll find in the summer that you'll need a bit more flour to absorb a given amount of liquid than you will in the winter. This is because it's humid and flour acts somewhat like a slightly dampened sponge as a result.

Second, this particular dough should be quite slack, i.e., very relaxed in order to make soft and tender buns. So you want to add only enough more flour, past the 3-cup point, to make the dough just kneadable; sprinkling only enough more to keep it from sticking to you or the board.

Mixing: In a large bowl, dissolve the sugar and then the yeast in the warm water. Add the milk, oil, salt and 2 cups of flour to the yeast mixture. Beat vigorously for 2 minutes.

Gradually add flour, 1/4 cup at a time, until the dough begins to pull away from the sides of the bowl. Turn the dough out onto a floured work surface.

Kneading: 
Knead until you have a smooth, elastic dough. Because this dough is so slack, you may find that a bowl scraper or bench knife can be helpful in scooping up the dough and folding it over on itself.  I didn't have to knead a lot, the mixer did most of it.

Rising: 
Put the dough into an oiled bowl. Turn once to coat the entire ball of dough with oil. Cover with a tightly-woven dampened towel and let rise until doubled, about one hour.

Shaping: 
Turn the dough out onto a lightly oiled work surface. Divide into 9 equal pieces. This is done most easily by dividing the dough first into thirds, then those thirds into thirds, then the halves into thirds.

Shape each piece into a ball. For hamburger buns, flatten the balls into 3 1/2-inch disks. For hot-dog buns, roll the balls into cylinders, 4 1/2-inches in length. Flatten the cylinders slightly; dough rises more in the center so this will give a gently rounded top versus a high top.

For soft-sided buns, place them on a well-seasoned baking sheet a half inch apart so they'll grow together when they rise. For crisper buns, place them three inches apart.

Second Rising: Cover with a towel and let rise until almost doubled, about 45 minutes. 

Baking:
Fifteen minutes before you want to bake your buns, preheat your oven to 400°F. Just before baking, lightly brush the tops of the buns with the egg wash and sprinkle with whatever seeds strike your fancy.

Bake for 20 minutes or until the internal temperature of the bread reaches 190°F. (A dough thermometer takes the guesswork out of this.)

When the buns are done, remove them from the baking sheet to cool on a wire rack. This will prevent the crust from becoming soggy.

Adapted from King Arthur Flour by Carol 

11 January 2011


I love the idea of a Sunday night dinner that can then easily be made into something else later in the week.  I bought a pork loin roast with the idea of stuffing it and roasting it until I ran across this recipe in Fine Cooking for a brined pork loin served on a nest of fennel and apple.  Besides being easy it was delicious.  Later in the week I'll use the leftover roast for Mu Shu.  I had a roast that was a little over 2 pounds so I meant to cut the recipe in half and forgot!  Seemed to still be the right amount of every thing.  This made more than enough for the 2 of us, leftovers for lunch and another dinner.

Roast Pork with Maple Mustard Crust
Serves 4

For the Brine:
8 cups cold apple cider or juice
3/4 cup kosher salt
1/4 cup light brown sugar
2 cloves garlic, smashed
3 sprigs fresh thyme
One 4-lb. boneless pork loin roast (or two 2-lb. loins), trimmed only if it has a thick layer of fat
For The Roast:
1/4 cup maple syrup
3 Tbs. whole-grain Dijon mustard
2 tsp. chopped fresh thyme
3/4 tsp. freshly ground black pepper; more to taste
1 large fennel bulb or 2 small bulbs, quartered, cored, and thinly sliced
1 Granny Smith apple, peeled, cored, and cut into 1/2-inch pieces
1 Tbs. olive oil
1/2 tsp. kosher salt

Brine the pork: Combine 2 cups of the apple cider or juice with the salt, brown sugar, garlic, and thyme in a 3- to 4-quart saucepan and bring to a boil over high heat, stirring so the salt and sugar dissolve, about 3 minutes. Add the remaining apple cider or juice and cool to room temperature. Transfer to a large container, add the pork, cover, and refrigerate for at least 8 hours and up to 18 hours.
Roast the pork: Position a rack in the center of the oven and heat the oven to 450°F. In a small bowl, mix the maple syrup, mustard, thyme, and pepper. Drain the pork and pat dry with paper towels. Brush the pork all over with the mustard mixture.
In a medium bowl, toss the fennel and apple with the oil, salt, and a few generous grinds of pepper. Scatter the mixture in the bottom of a large roasting pan (large enough to hold the pork with a couple of inches of space around the perimeter). Put the pork, fat side up, on top of the fennel and apples. Roast the pork until the crust just starts to brown, about 15 minutes. Reduce the heat to 350°F and continue cooking until an instant-read thermometer inserted into the thickest part of the loin registers 145°F, 30 to 50 minutes more.
Let rest for 10 minutes and then thinly slice a quarter to a third of the pork. Serve, topped with the fennel, apple, and juices. Allow the remaining pork to cool to room temperature, wrap well with foil, and refrigerate for up to 5 days.

Source:  Fine Cooking

09 January 2011


Part of my Christmas Tradition is to make plate fulls of cookies and candies to share with my neighbors, friends and family.  My neighbor Sara returned the gift in the form of cream of onion soup and bread on that was in my kitchen when I arrived home from work on Monday.  I couldn't return the dish empty so that gave me an excuse to try a decadent sounding brownie I found on Annie's Eats.  I'm not a big brownie fan, these could change that!

Peanut Butter Cheesecake Swirl Brownies

Yield: 30-36 brownies

Ingredients:
For the brownies:
14 tbsp. unsalted butter
6 oz. bittersweet chocolate, coarsely chopped
1 cup cocoa powder 
2 cups sugar
6 oz. cream cheese, softened
6 large eggs
2 tsp. vanilla extract
½ tsp. salt
1 cup all-purpose flour

For the peanut butter cheesecake swirl:
8 oz. cream cheese, at room temperature
2/3 cup creamy peanut butter
6 tbsp. sugar
1 large egg
1 tsp. vanilla extract

Directions:
Preheat the oven to 350˚ F.  Line a 9 x 13-inch baking pan with foil and spray lightly with cooking spray.  To make the brownie batter, combine the butter and chocolate in a large heatproof bowl set over simmering water.  Heat, stirring occasionally, until the mixture is completely melted and smooth.  Remove the bowl from the heat.  Whisk in the cocoa powder, sugar, eggs and cream cheese until smooth and well blended.  Mix in the vanilla and salt.  Add the flour to the bowl and whisk just until incorporated.  Pour the brownie batter into the prepared baking dish and smooth the top with a spatula.

To make the peanut butter cheesecake portion, combine the cream cheese, peanut butter and sugar in the bowl of an electric mixer.  Beat on medium-high speed until completely smooth, about 2-3 minutes.  Blend in the egg and vanilla until incorporated, scraping down the bowl as needed.
Drop spoonfuls of the peanut butter mixture over the brownie batter in the pan, creating a cobblestone appearance.  Use a knife or wooden skewer to gently swirl together the peanut butter mixture and brownie batter.  Bake 30-35 minutes, until the center is just set.

Transfer to a wire rack and let cool to room temperature.  Cover and refrigerate until well chilled before slicing and serving.

Source:  Annie's Eats

08 January 2011

I am always searching for the perfect beans, or perfect rice side dish to go with Mexican dishes.  This recipe from Fine Cooking combines the two in a very satisfying side dish.  I served it with my own adaptation of Benchiladas from Annie's Eats Blog.  I think they'd make a great one dish meal with the addition of some chorizo.  I used diced tomatoes with jalapeños and skipped the jalapeño.  Next time I'll probably add chopped jalepeno too, it could have had a little more spice.  I also substituted about 1 tablespoon of dried oregano for the fresh.

Mexican Tomato Rice and Beans
Serves 6-8

Ingredients:
1 cup uncooked medium-grain white rice
1 14-1/2-ounce can diced tomatoes (preferably “petite-cut”)
2 Tbs. extra-virgin olive oil
6 medium cloves garlic, finely chopped
1 medium fresh jalapeño, cored and finely chopped (if you like spicy foods, leave in the ribs and seeds; if not, remove them)
1 15-oz. can black beans, drained and rinsed
2 tsp. kosher or fine sea salt
2 tsp. ground cumin
1 tsp. chili powder
1/4 cup finely chopped fresh oregano leaves and tender stems
1/4 cup finely chopped fresh cilantro leaves and tender stems

Directions:
In a 1-quart saucepan, combine the rice with 2 cups cold water. Bring to a boil over medium-high heat, cover, reduce the heat to low, and cook for 20 min. Remove from the heat and let the pan stand, covered, for another 5 min.
While the rice steams, set a fine sieve in a bowl and drain the can of tomatoes. Pour the tomato juices into a 1-cup liquid measure. Add enough water to the tomato juices to equal 1 cup.

Heat a 10- to 12-inch skillet over medium-high heat. Pour in the oil and stir-fry the garlic and jalapeño until the garlic browns and the jalapeño smells pungent, about 1 min. Add the black beans, salt, cumin, and chili powder; stir two to three times to incorporate the mixture and cook the spices, about 30 seconds. Stir in the tomato juice and water mixture and bring to a boil. Adjust the heat to maintain a gentle boil and cook, stirring occasionally, until the beans absorb much of the liquid, 5 to 7 min. Add the tomatoes, oregano, cilantro, and cooked rice and cook, stirring occasionally, until the rice is warm, 1 to 2 min. Serve immediately.